This is another DIY nail art post. Ignore it if you hate it, read on if you don’t 🙂 I will be back with a delightful brownie recipe tomorrow!
ESSIE Lapis of Luxury + OPI Dazzled by Gold
I think it is fair to say that I’m obsessed with nail polish this summer.
It’s also fair to say that I am also obsessed with glitter…all the time. Ask Sean, he’ll tell you all about it.
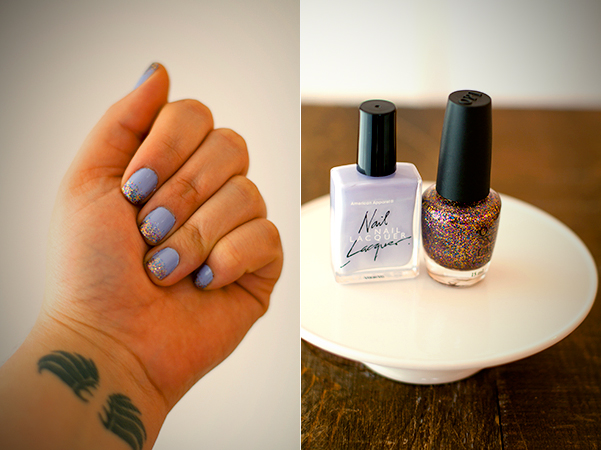
So it’s no surprise that my current favorite mani is this one, a sponged on glittered-tip application.
AMERICAN APPAREL Summer Peach + OPI Dazzled by Gold
I LOVE it, love it. Just can’t get enough…for real. I’ve rocked this look on my nails for the last couple of weeks and I don’t see it going anywhere soon.
Here is how to do it:
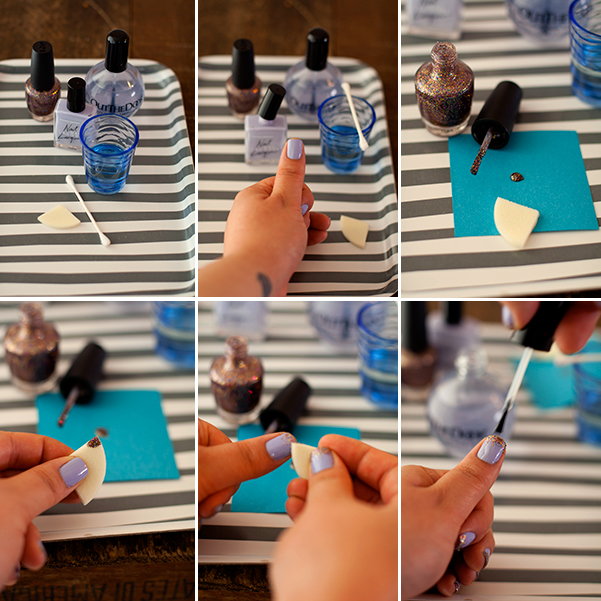
*Paint on 2 coats of your color of choice on CLEAN and DRY nails. Allow base color to dry completely.
*Dot a small amount of glitter polish onto a scrap of paper (I used a Post-It). Use a small amount so it doesn’t dry out, thus wasting precious glitter polish.
*Using a small piece of make-up sponge, dab glitter polish onto tip of nail. Continue to dab onto tips–heavier at the very tip of the nail to create a gradient look–until the very tip is completely covered in glitter. This layer will dry fairly quickly.
*Finish with a coat of quick-dry top-coat of your choice. This will allow your freshly polished nails to last longer. Clean-up skin around your nail with a remover-soaked q-tip.
AMERICAN APPAREL L’esprit + OPI Sparkle-icious
To ensure that my polish is smooth and sticks to my nails for days, here are some tips I’ve learned:
Roll your polish between two palms instead of shaking. Shaking your polish bottles causes air bubbles to form on your nail surface–thus ruining the smooth effect that I so covet when painting my nails.
Remove all previous polish from nails before beginning. Filing and buffing is a good idea too, but usually I just can’t be bothered. Also, push back those cuticles!
Use a special base coat formula if so inclined, but more importantly start with CLEAN and DRY nails. Oily or greasy nails will just make the inevitable chipping (and even the dreaded peeling) happen more quickly.
Layer 2 coats of polish to get a saturated look. Keep in mind, some polishes are more opaque than others. A sheer formula will still be sheer after two coats. I also think thinner coats are better than thicker–in my experience thicker coats mean more chipping.
When using a Q-tip for clean up, I soak it in remover and then roll the q-tip between my fingers to make sure there isn’t any stray cotton that will drag and possibly ruin my fresh mani.
Be patient! Don’t start a multi-step mani if you have to be doing something with your hands in 10 minutes. I like to give myself at least 30 minutes, if not an hour. I usually do my nails right before I go to bed, when I have something awesome saved on my DVR. If I do this, I forgo the q-tip clean-up and just clean it off in the shower–the scrubbing action of washing my hair usually gets it all off effectively!
**I am not a professional manicurist or beauty expert! I’m just a girl with an obsession with all things pretty and I like DIY. The original technique for sponging was seen on YouTube here (she also has lots of marble nail tutorials. FUN!).
***I am not a paid sponsor of OPI, Out the Door, Essie, or American Apparel. All of the polishes and products I use are purchased by me. All opinions are my own.


Fancy! I had no idea AA did nail polish. Love your fun colors!
Thanks Nicole! I only recently discovered that AA did polish…they have a lot of fun colors too!
Oh snap! This is so gorgeous! I am going to give this a whirl tonight! Thanks~
do it!
Whoa! I absolutely love this! I’m glad you put this on here because that peach + gold glitter combo has me dying. (in the good Rachel Zoe way)
i bought that peach color just for this! it’s my fave combo yet…i’m glad we like it.
i love american apparel nail polish. and glitter : ) this idea is awesome.
love, little.
thanks little! i’m loving the american apparel polish…i want some of the neon ones next!
I am so getting (someone else to) this done tomorrow. So purdy. Unfortunately my nails SUCK and what I have to do is get them done once and a while. Tomorrow is a wedding, and I’m making the cake and cupcakes…so I better be presentable in case the cake isn’t!! xo
awesome zoe! be sure to take a picture! I bet the cake and cupcakes will be amazing!!! some blinging nails are just the extra touch of class 🙂
I love this look, and I love your whole blog!!
Amanda, it’s pretty, right? Thanks for visiting 😀
GORGEOUS! I must do!
Josie, do it! take a picture and let me know how it goes!
I love the Dazzeled by Gold and Summer Peach….I am trying to find Dazzled by Gold OPI, where were you able to find it?
Erika, did some searching and I think the Dazzled By Gold-OPI color was an Ulta holiday exclusive…I actually wanted to buy another bottle but didn’t have luck finding it. I did find an Orly polish that I think is a close match (not as yellow in the gold, but still beautiful), it’s called Luxe. I hope that helps!